How to build a meme generator with JavaScript and Fabric.js
Introduction
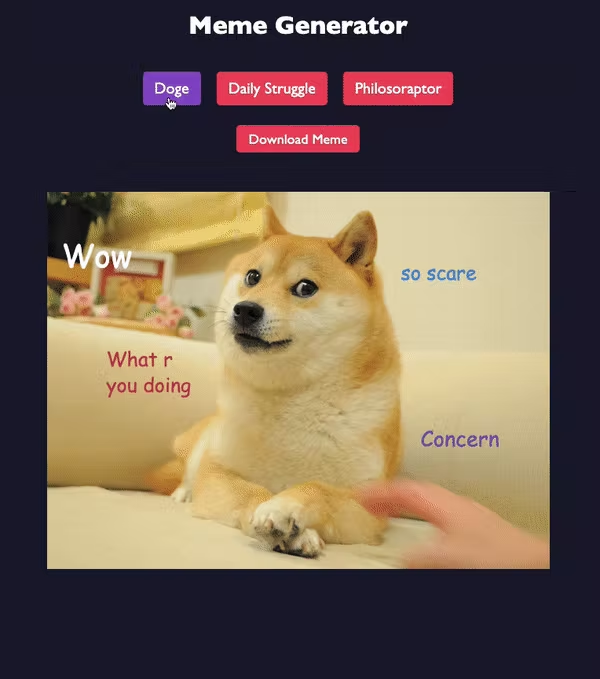
Memes are great: We can use them for humor, cryptocurrency, and even for learning JavaScript! In this tutorial, I'll show you how to make a meme generator with JavaScript and Fabric.js that lets you customize templates from three popular memes: Doge, Daily Struggle, and Philosoraptor. Users will be able to select one of the templates, edit and move the text fields, then download their creation. Here's what it looks like in action:
At the end of this tutorial, I'll give you some ways that you can extend this project and make it your own.
Prerequisites
This is a JavaScript-focused tutorial; you should have experience with:
- Basic HTML and CSS
- JavaScript fundamentals
- Basic DOM manipulation
Having some knowledge of the <canvas> element and the Canvas API is helpful but not required. I would recommend giving the MDN Canvas API docs a glance before continuing.
What is Fabric.js?
The HTML <canvas> element and Canvas API allow us to draw graphics in the browser with JavaScript. However, the Canvas API is low-level and can be difficult to work with. This tutorial will introduce Fabric.js (Fabric), which is one of the many libraries that make working with the Canvas API easier. Our meme generator will use Fabric to render the template images and text fields on the canvas, and to export it to an image that we can download.
One benefit of Fabric is its object model for interacting with canvas elements. For instance, this is how we could create a rectangle using the native API:
const canvas = document.getElementById('canvas');
const ctx = canvas.getContext('2d');

ctx.fillStyle = 'blue';
ctx.fillRect(0, 0, 400, 200);
With the native API, we manipulate the canvas through a context object representing the entire canvas. With Fabric, we operate on objects within the canvas. Here's how we would create the same rectangle and add it to the canvas with Fabric:
const canvas = new fabric.Canvas('canvas');

const rect = new fabric.Rect({
    top: 0,
    left: 0,
    width: 400,
    height: 200,
    fill: 'blue',
});

canvas.add(rect);
Fabric's API is easier to use and understand, even in this simple example. Additionally, Fabric provides many features that the Canvas API lacks, such as additional built-in shapes, an interactivity layer, and object grouping.
Cloning the starter code
To keep this tutorial focused on JavaScript and Fabric, I've created a starter-code branch in the tutorial's GitHub repository that contains the HTML and CSS for the project, as well as the meme template data. The completed project can be found on the main branch.
Run the following commands to clone the repository, check out the starter-code branch, and move into the repository:
$ git clone -b starter-code https://github.com/zachsnoek/meme-generator.git
$ cd meme-generator
Go ahead and open the new meme-generator directory in your text editor. You should see the following directories and files:
meme-generator/
├─ css/
│  ├─ styles.css
├─ img/
│  ├─ placeholder.jpg
├─ js/
│  ├─ meme-templates.js
├─ index.html
Live Server
I recommend using VS Code as your text editor with the Live Server extension when working through this tutorial. You can simply open index.html and hit alt+L on Windows or cmd+L on macOS to start a local development server, and the server will automatically reload whenever a change in the project has been made.
Exploring the starter code
index.html
This is our simple HTML file for the project. The <div> with the template-selectors ID is where the template selector buttons––the buttons that allow you to switch templates––will be rendered by our JavaScript. We'll add an event listener to the <button> so that our templates can be downloaded, and the <canvas> element is where we'll render our templates.
css/styles.css
The styles for this project are pretty simple, but I do want to point out the .selected-template CSS class. When a template selector button is clicked, we'll apply this class to the button to indicate the currently selected template.
img/
This directory will contain all of the meme background images for our templates. I'll leave it up to you to download the images and place them in img with the filenames listed below:
(placeholder.jpg is not needed; you can safely delete this image.)
Exploring the meme templates
When our meme generator is loaded and when we select a template, we will render a template on the canvas. Each template is a JavaScript object that contains metadata about the meme, such as the background image and text fields. Fabric will use this information to render the template on the canvas. All of the templates are exported as an array from js/meme-templates.js:
export default [
    {
        name: 'Doge',
        backgroundUrl: 'img/doge.jpg',
        width: 640,
        height: 480,
        textFields: [
            {
                text: 'Wow',
                fill: '#fff',
                fontFamily: 'Comic Sans MS',
                left: 18,
                top: 60,
            },
            // ...
        ],
    },
    // ...
];
Let's break down the properties in our template objects:
name: The template's display name shown in the selector.backgroundUrl: The path to the template's background image. We store all of the images locally inimgfor this tutorial.width: The width of the image in pixels. This is used for setting the canvas' size.height: The height of the image in pixels. This is used for setting the canvas' size.textFields: An array containing objects that describe the individual text fields to render.textis the text to display in the field the the other properties are used to style the text.
Accessing the canvas with Fabric.js
Now that we understand the provided code and templates, let's get started by accessing the canvas. We'll first need to create a JavaScript file for all of our meme generator's code. Create a file in js named index.js, and add a <script> tag in index.html to refer to it:
<body>
    <!-- ... -->
    <script src="./js/index.js" type="module"></script>
</body>
Next, we need to load Fabric from the CDN by adding another <script> tag above the one we just added:
<body>
    <!-- ... -->
    <script
        type="text/javascript"
        src="https://cdnjs.cloudflare.com/ajax/libs/fabric.js/4.5.0/fabric.min.js"
    ></script>
    <script src="./js/index.js" type="module"></script>
</body>
Now we can create a fabric.Canvas object to access the canvas. Add the following line to the top of index.js:
const canvas = new fabric.Canvas('canvas');
fabric.Canvas is a wrapper around the <canvas> element and it manages all of the Fabric objects on the canvas. It also allows us to configure canvas settings such as the size and background color.
Let's make sure we've accessed the canvas properly by adding the following code to set the canvas' width, height, and background color:
canvas.setWidth(500);
canvas.setHeight(500);
canvas.setBackgroundColor('red');
If you open index.html in your browser or start Live Server, you should see a square, red canvas.
Rendering a meme template
We've verified that we can access the canvas using Fabric, so let's create a function called renderTemplate that will render a meme template on the canvas. When a selector is clicked, we'll pass the corresponding template's metadata (from meme-templates.js) to the function.
Add the following function declaration in index.js:
const canvas = new fabric.Canvas('canvas');

function renderTemplate(template) {}
template will be one object from our template metadata array. Next, we'll get the data needed for the canvas by destructuring the template object:
function renderTemplate(template) {
    const { width, height, backgroundUrl, textFields } = template;
}
The rest of this function will be responsible for setting the canvas' dimensions, setting the background image, and adding the meme's text fields.
Setting the canvas' dimensions is straightforward with Fabric's canvas.setDimensions API:
function renderTemplate(template) {
    const { width, height, backgroundUrl, textFields } = template;

    canvas.setDimensions({ width, height });
}
This will ensure that the canvas is the same size as the background image. Next, we'll set the background image with canvas.setBackgroundImage and give it two arguments: The URL of the image and a callback to call when the image is loaded. In our case, the template's URL points to an image in the img directory and the callback will re-render the canvas:
canvas.setBackgroundImage(backgroundUrl, canvas.renderAll.bind(canvas));
Lastly, we need to create the meme's text fields and add them to the canvas. We'll use Fabric's IText class, which allows us to create interactive text fields that we can reposition, resize, and edit on the canvas directly. The IText constructor also accepts an options object with options such as the text's font family, size, and color; these options correspond with the properties in the text field objects in our textFields arrays.
Our text field objects have the text property and other style options on one level, but IText's constructor expects the text and options to be two different arguments. To fix this, let's map over our template's textFields to create an array of IText objects, then add them to the canvas using canvas.add:
const iTextFields = textFields.map(
    ({ text, ...options }) => new fabric.IText(text, options)
);
canvas.add(...iTextFields);
Let's verify our implementation of renderTemplate by importing our meme templates and passing the first value to it:
import templates from './meme-templates.js';

const canvas = new fabric.Canvas('canvas');

function renderTemplate(template) {
    // ...
}

renderTemplate(templates[0]);
If all goes well, you should see a nice Doge in your browser:
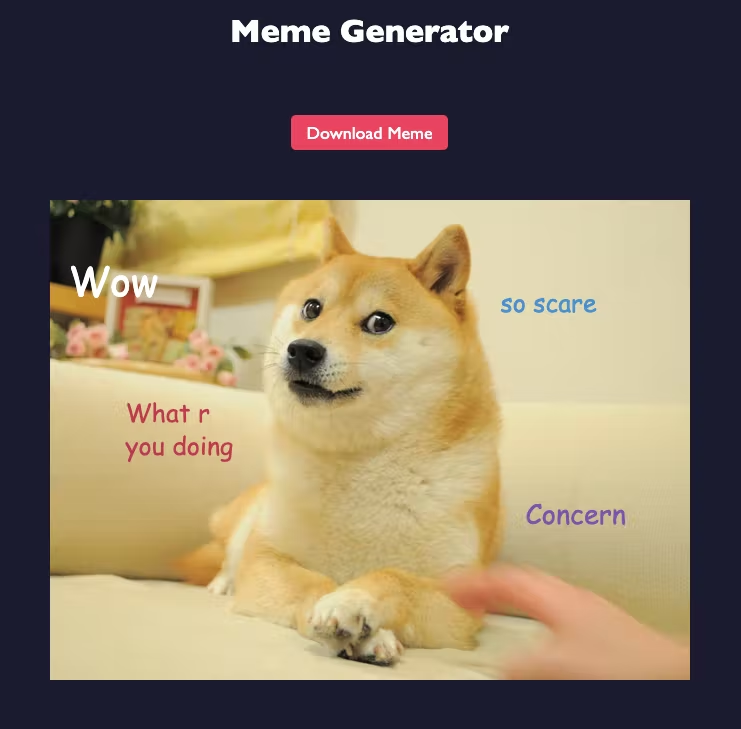
Try moving around the text fields and editing the text. Fabric gives us this functionality without much effort on our end.
Creating the template selectors
Next, let's add the ability to create selector buttons for each of our templates so that our users can edit different memes:

We'll create a function called createSelector , and it will return a <button> that will render a template when clicked.
In index.js, add the createSelector function declaration that takes a template object as an argument, creates a <button> element, and returns it:
import templates from './meme-templates.js';

const canvas = new fabric.Canvas('canvas');

function createSelector(template) {
    const selector = document.createElement('button');

    return selector;
}
// ...
We want to identify the template that this button renders, so set the text of the button to be the template's name:
function createSelector(template) {
    const selector = document.createElement('button');

    selector.innerText = template.name;

    return selector;
}
To actually render the template on click, we'll add a click handler that calls renderTemplate and adds the .selected-template class to the current element. Since there will be multiple template selectors, we also need to remove the .selected-template class from the previously-selected button. Your click handler should look like something like this:
function createSelector(template) {
    const selector = document.createElement('button');

    selector.innerText = template.name;
    selector.onclick = function () {
        document
            .querySelector('.selected-template')
            .classList.remove('selected-template');
        this.classList.add('selected-template');
        renderTemplate(template);
    };

    return selector;
}
Great! Next, we'll actually create the selectors for all of our templates and render the first template.
Rendering the template selectors and the initial template
When the generator loads, we want to create template selectors for all of the templates, add them to the DOM, and render the initial template. The selector elements will be added within the aforementioned <div> with the template-selectors ID; let's start by grabbing that element:
import templates from './meme-templates.js';

const canvas = new fabric.Canvas('canvas');
const selectorsContainer = document.getElementById('template-selectors');
// ...
Next, for each template, create a selector for it and add it to the selectors container:
const selectorsContainer = document.getElementById('template-selectors');

for (const template of templates) {
    const selector = createSelector(template);
    selectorsContainer.appendChild(selector);
}
// ...
Lastly, we need to render the first template and add the .selected-template class to its selector:
selectorsContainer.firstChild.classList.add('selected-template');
renderTemplate(templates[0]);
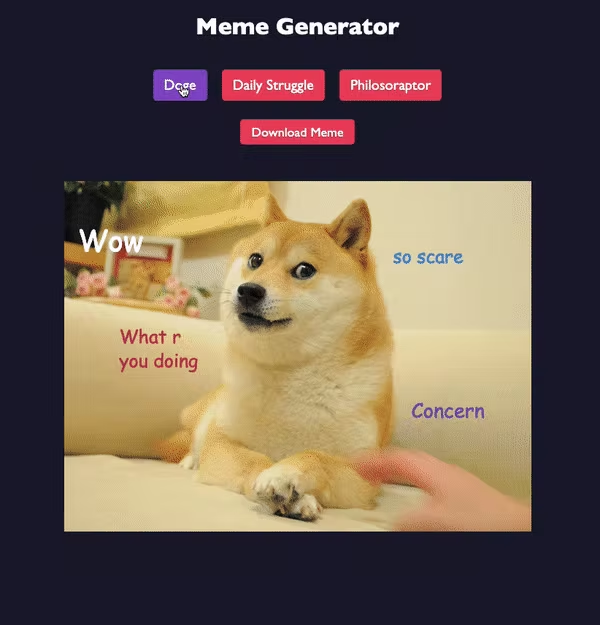
When you refresh the page, you should see selectors for all of the templates and the first template rendered in the canvas. Clicking each selector should render its template:
You'll notice that the text fields aren't removed when a new template is selected. To fix this, we need to clear the canvas before a template is rendered. In renderTemplate, call canvas.clear before adding anything to the canvas:
function renderTemplate(template) {
    const { width, height, backgroundUrl, textFields } = template;

    canvas.clear();
    // ...
}
Clicking each selector should now render the template as expected.
Adding a download button
Being able to customize our own meme templates is great, but it'd be nice if we could share them with others. I've added a <button> with an ID of download in the starter code; we'll attach a click handler to it that will create an <a> element with the canvas' data and then click it programmatically to download the image to the user's computer:
const downloadButton = document.getElementById('download');
downloadButton.addEventListener('click', () => {
    const link = document.createElement('a');
    link.href = canvas.toDataURL();
    link.download = `meme-generator-${new Date().getTime()}.png`;
    link.click();
});
This code creates a temporary link element and sets its href property to a data URL of the canvas exported as a PNG. We then set the filename of the download and click the link.
If you customize a template and click the download button, you should see a file with the name meme-generator-<current time>.png in your downloads folder:

Conclusion
Congratulations! You've created your very own meme generator. I hope you enjoyed this tutorial and learned a bit about memes and Fabric.js.
Where to go from here
The meme generator we've created is fairly simple and could be modified for additional template customization. Below are some ideas to extend this project:
- Add ability to add and remove text fields
- Add ability to change text styles such as font family, color, and outline
- Persist the state of each template in local storage
- Let users upload their own background image
- Add support for template styles that aren't simple text over background image
If you're interested in learning more about Fabric.js, I recommend starting with their Introduction to Fabric.js tutorials.
Let's connect
Come connect with me on LinkedIn, Twitter, and GitHub!
If you found this post helpful, please consider supporting my work financially:
☕️Buy me a coffee!